PyTorch for Deep Learning
Год выпуска: 2023
Производитель: ZeroToMastery
Сайт производителя: zerotomastery.io/courses/learn-pytorch/
Автор: Daniel Bourke
Продолжительность: 49h 2m 32s
Тип раздаваемого материала: Видеоурок
Язык: Английский
Описание: Learn PyTorch from scratch! This PyTorch course is your step-by-step guide to developing your own deep learning models using PyTorch. You'll learn Deep Learning with PyTorch by building a massive 3-part real-world milestone project. By the end, you'll have the skills and portfolio to get hired as a Deep Learning Engineer.
Learn PyTorch. Become a Deep Learning Engineer. Get Hired.
Содержание
PyTorch for Deep Learning
Course Welcome and What Is Deep Learning
Why Use Machine Learning or Deep Learning
The Number 1 Rule of Machine Learning and What Is Deep Learning Good For
Machine Learning vs. Deep Learning
Anatomy of Neural Networks
Different Types of Learning Paradigms
What Can Deep Learning Be Used For
What Is and Why PyTorch
What Are Tensors
What We Are Going To Cover With PyTorch
How To and How Not To Approach This Course
Important Resources For This Course
Getting Setup to Write PyTorch Code
Introduction to PyTorch Tensors
Creating Random Tensors in PyTorch
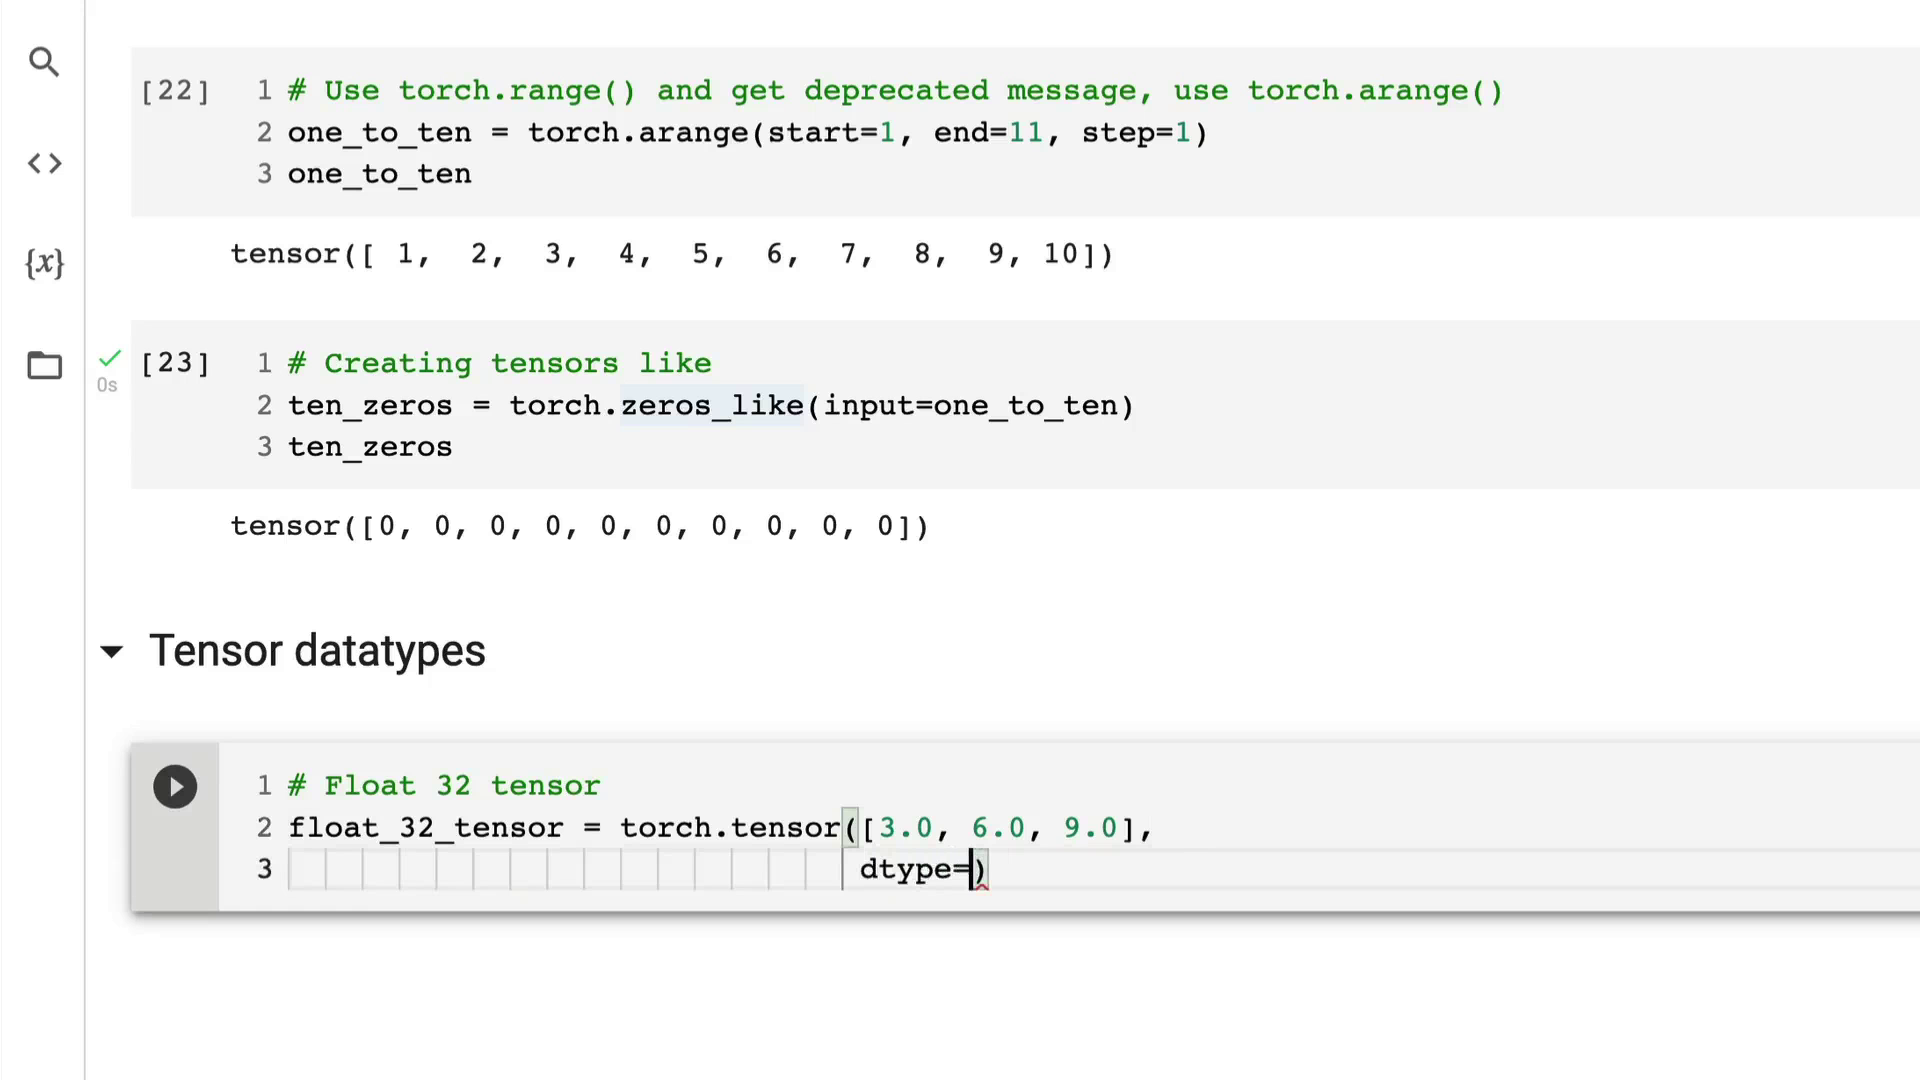
Creating Tensors With Zeros and Ones in PyTorch
Creating a Tensor Range and Tensors Like Other Tensors
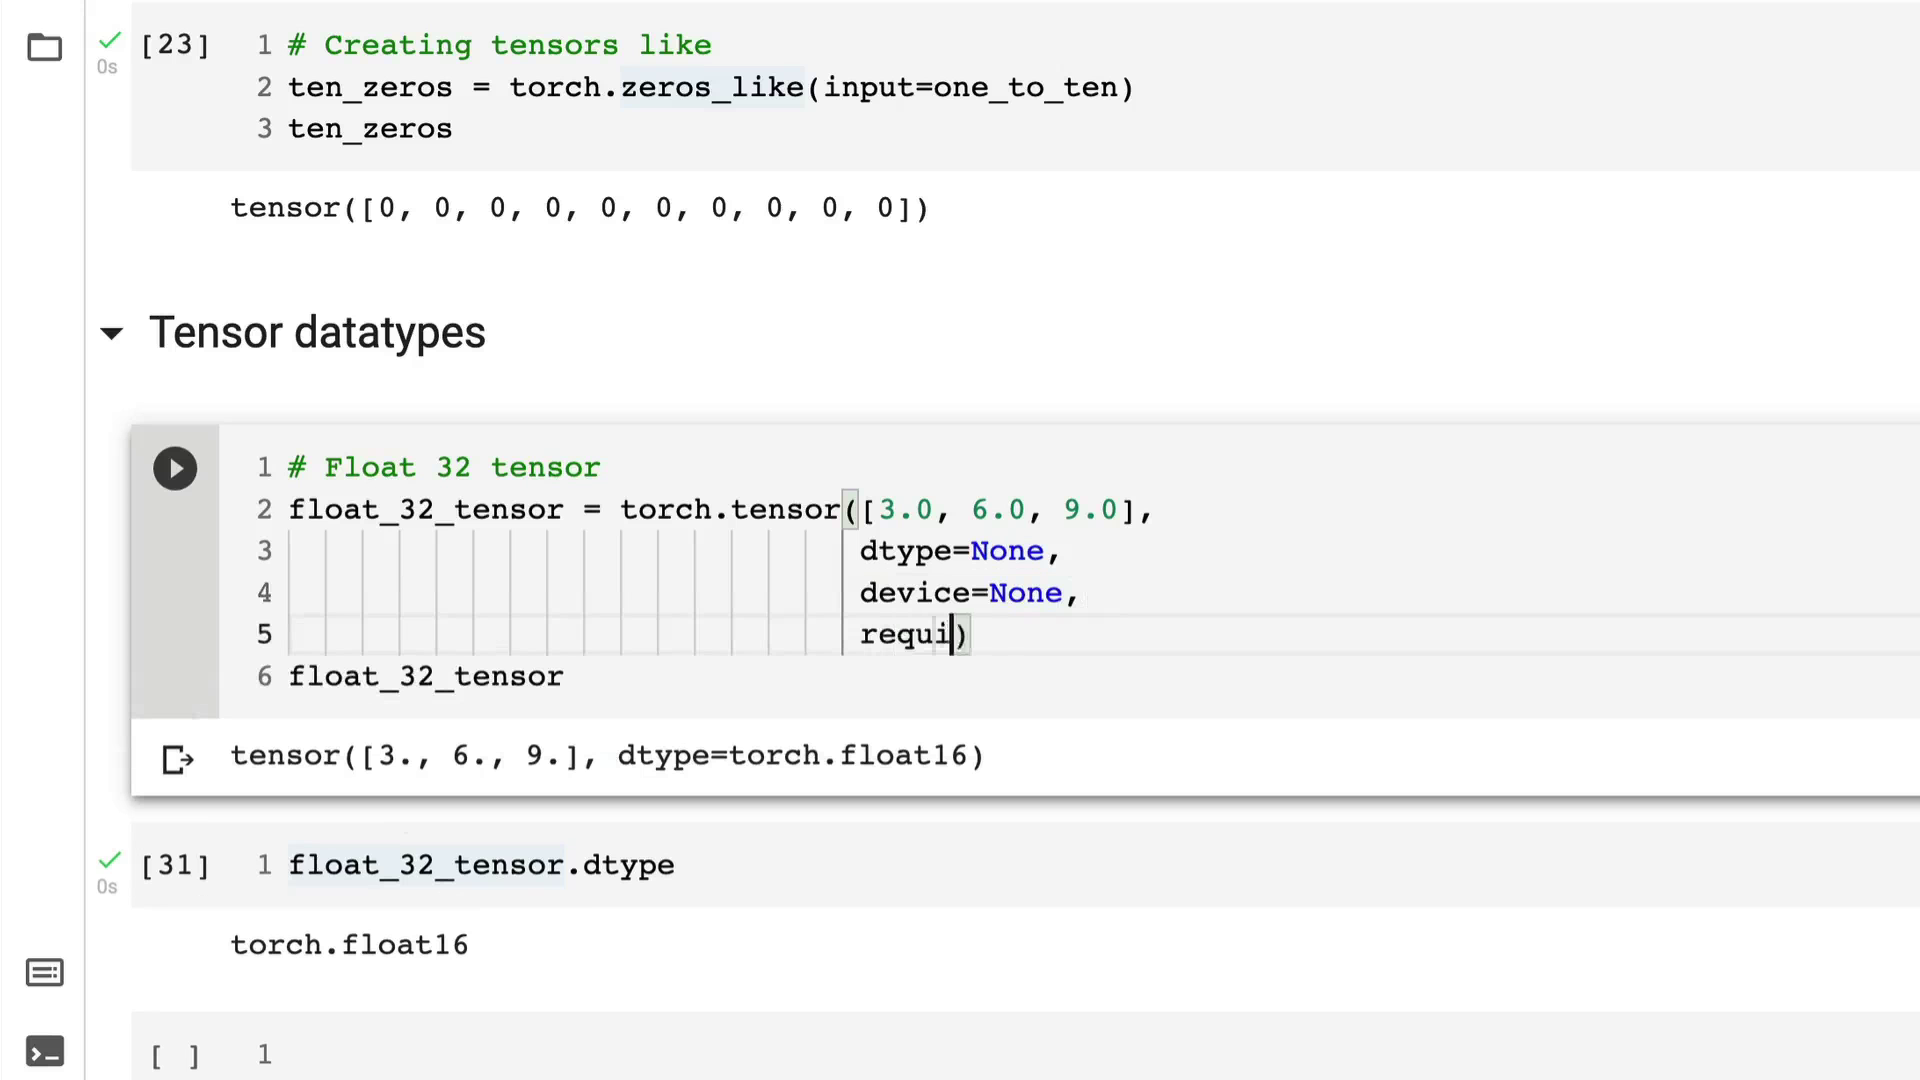
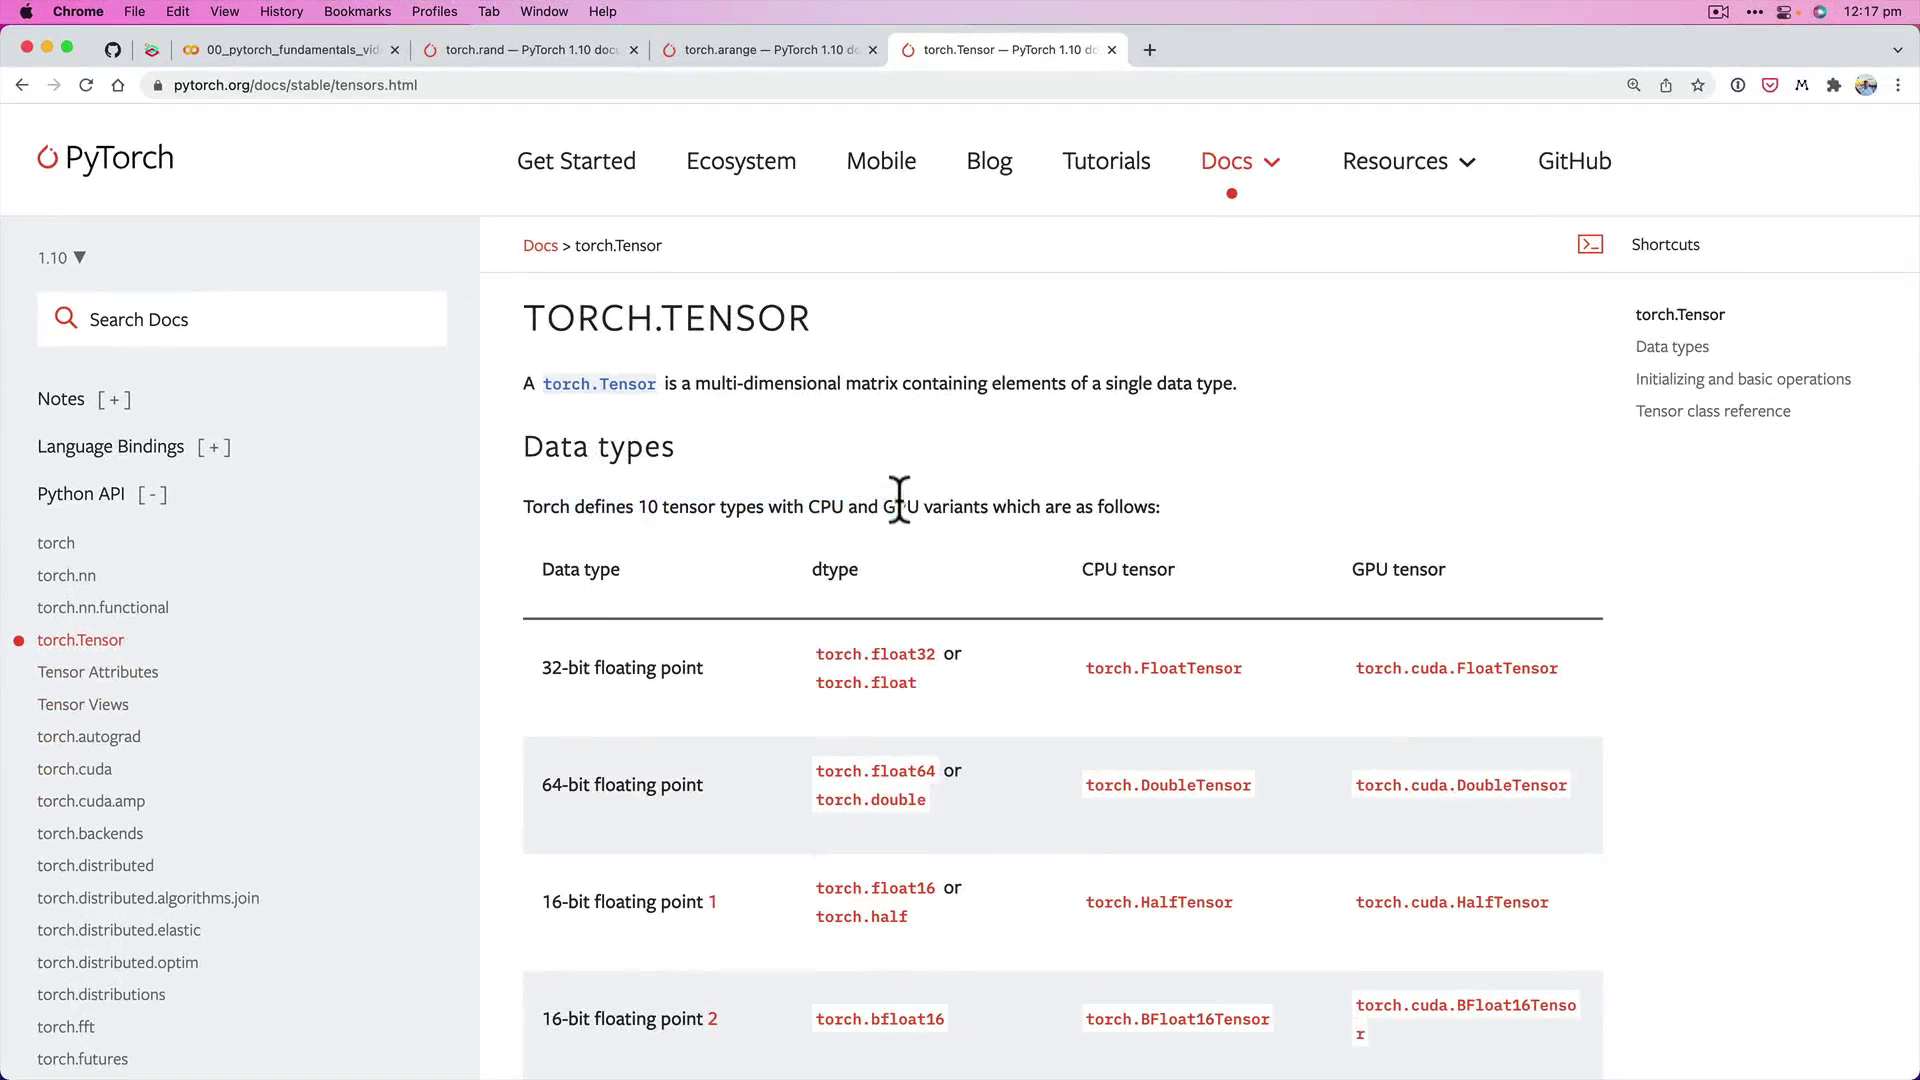
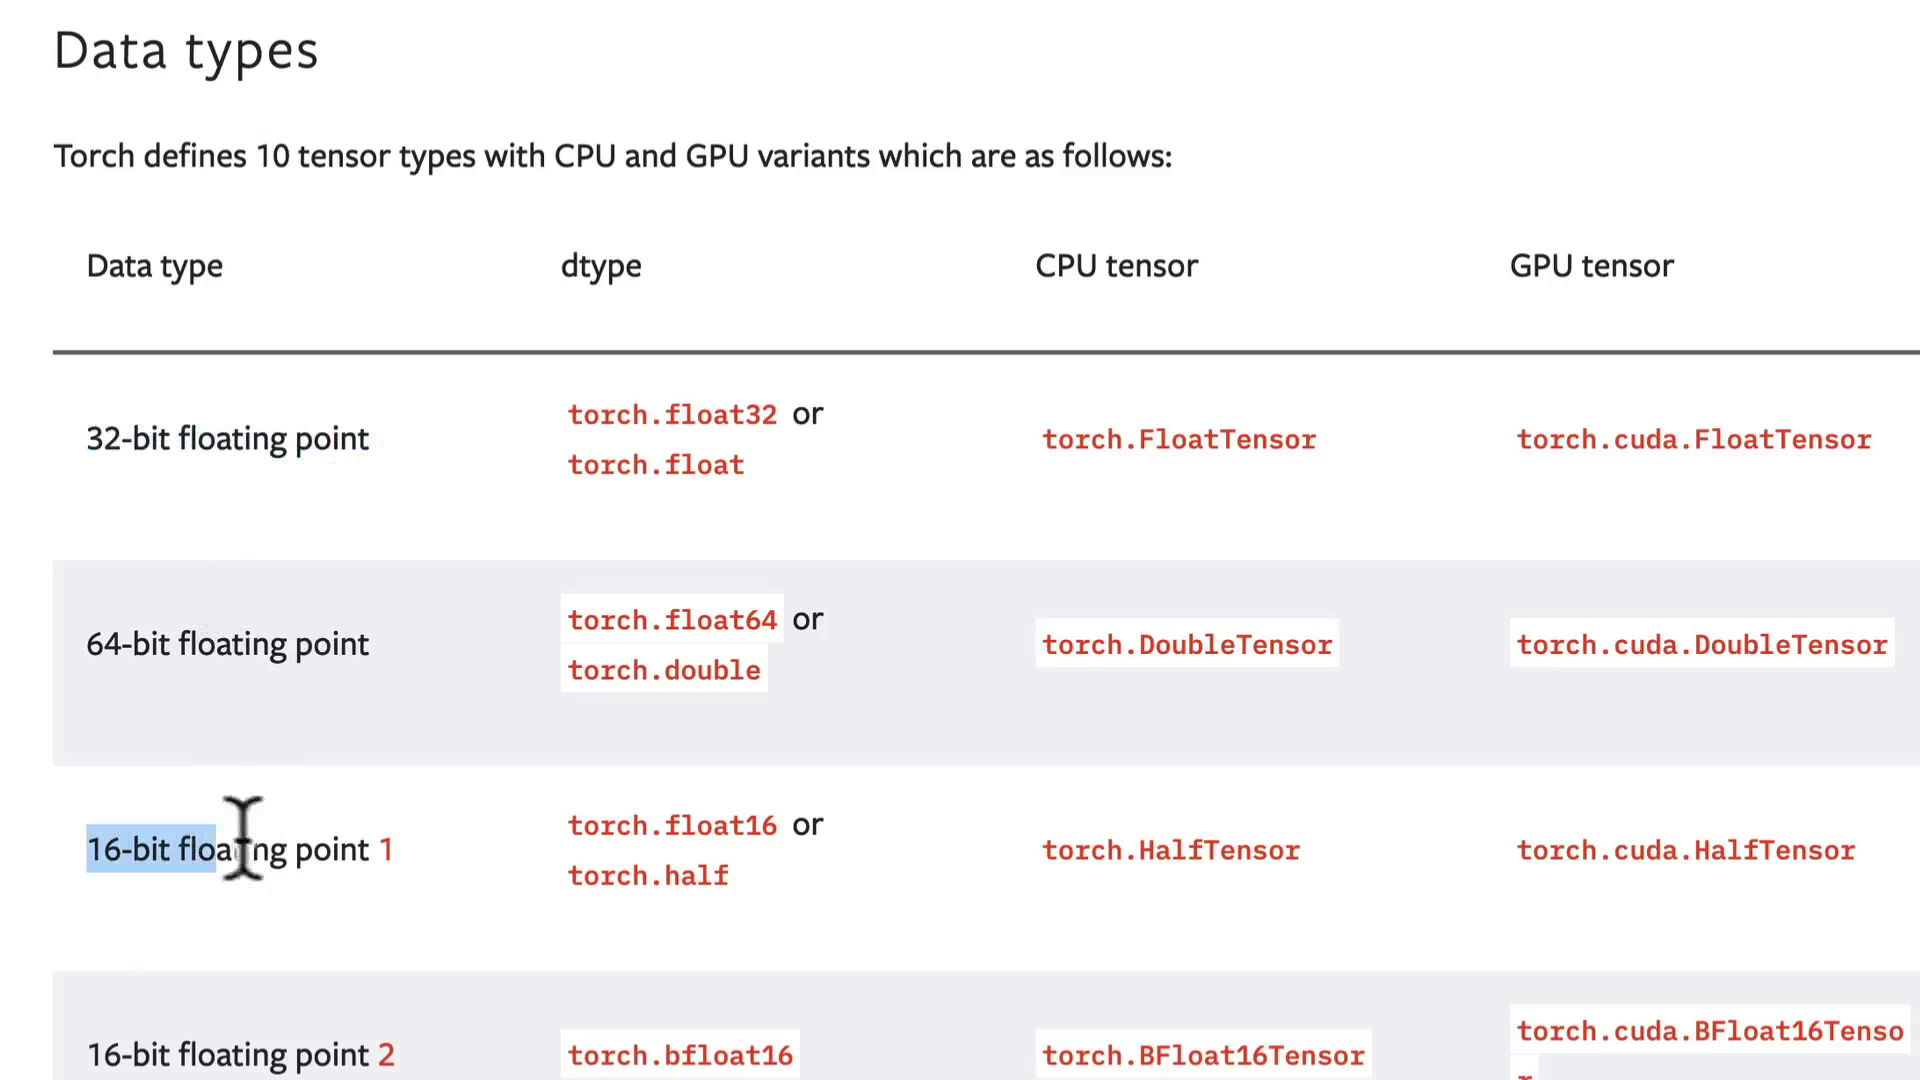
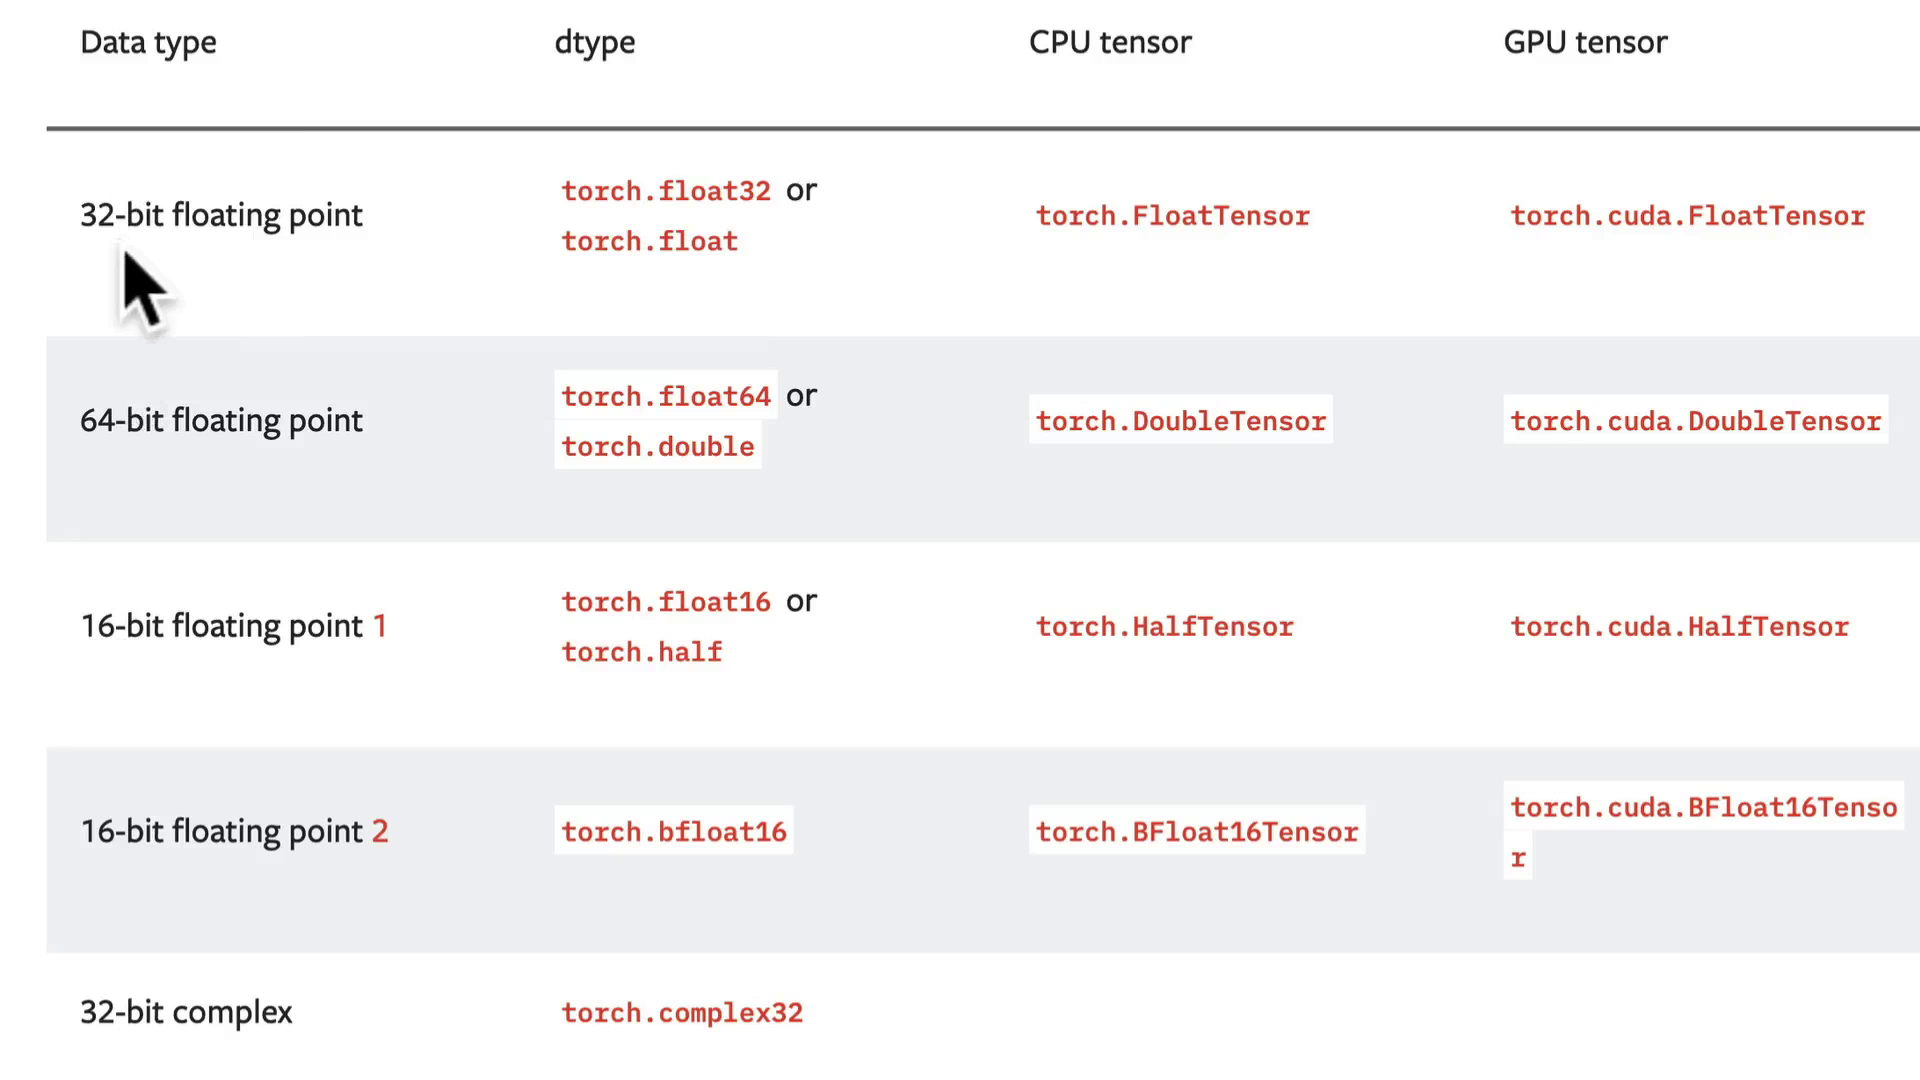
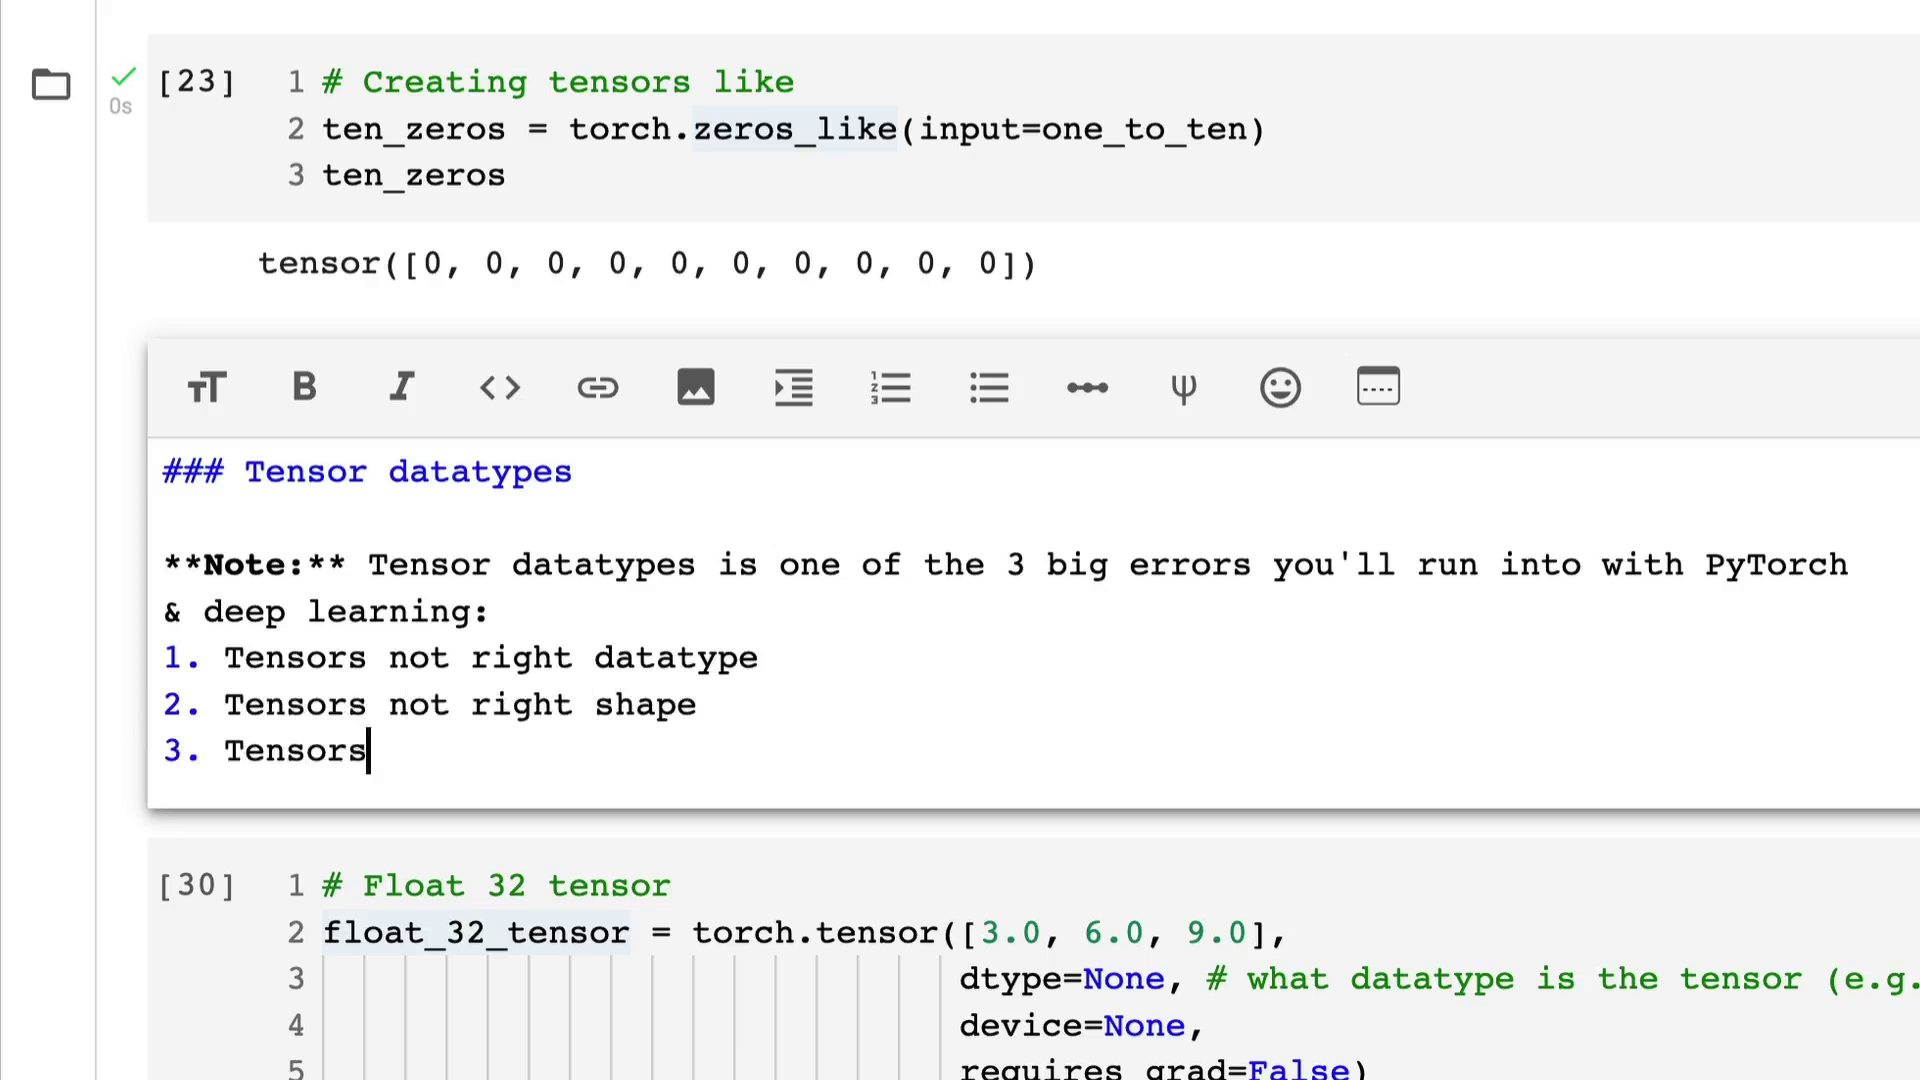
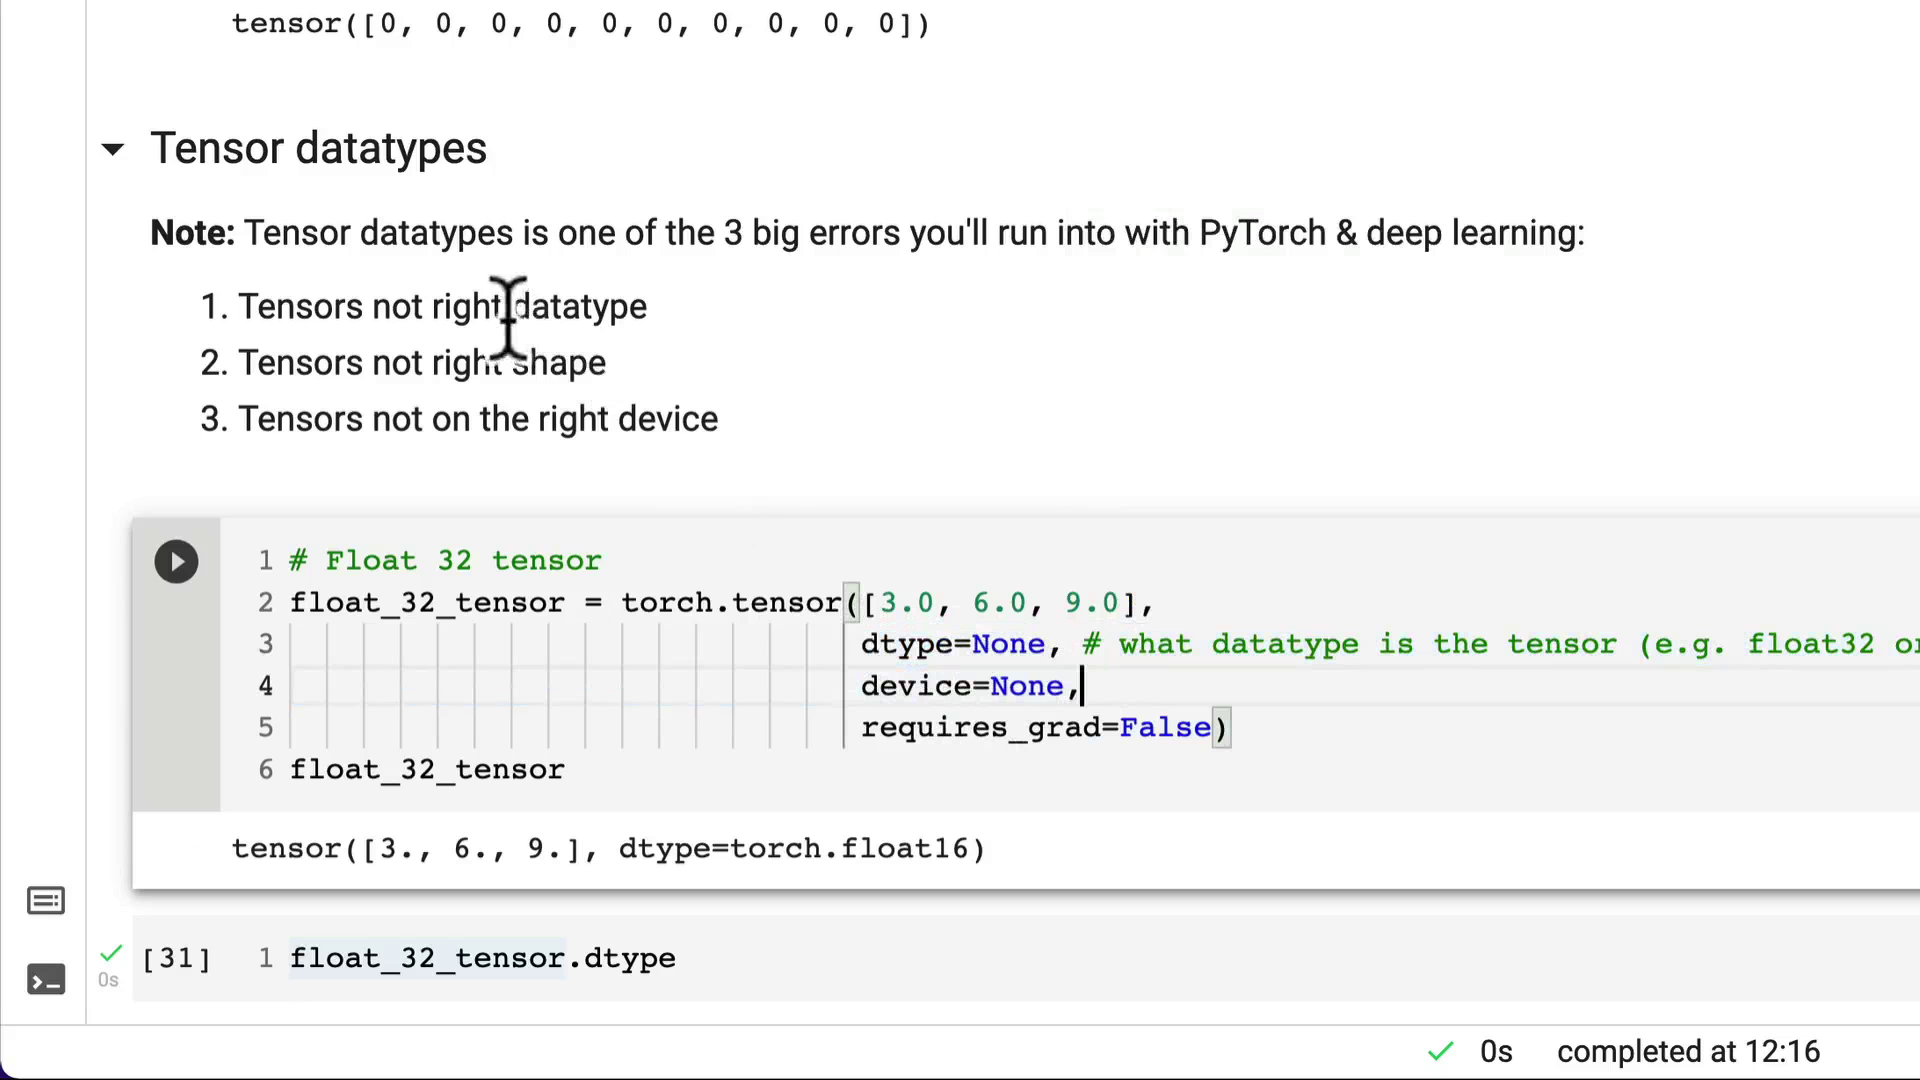
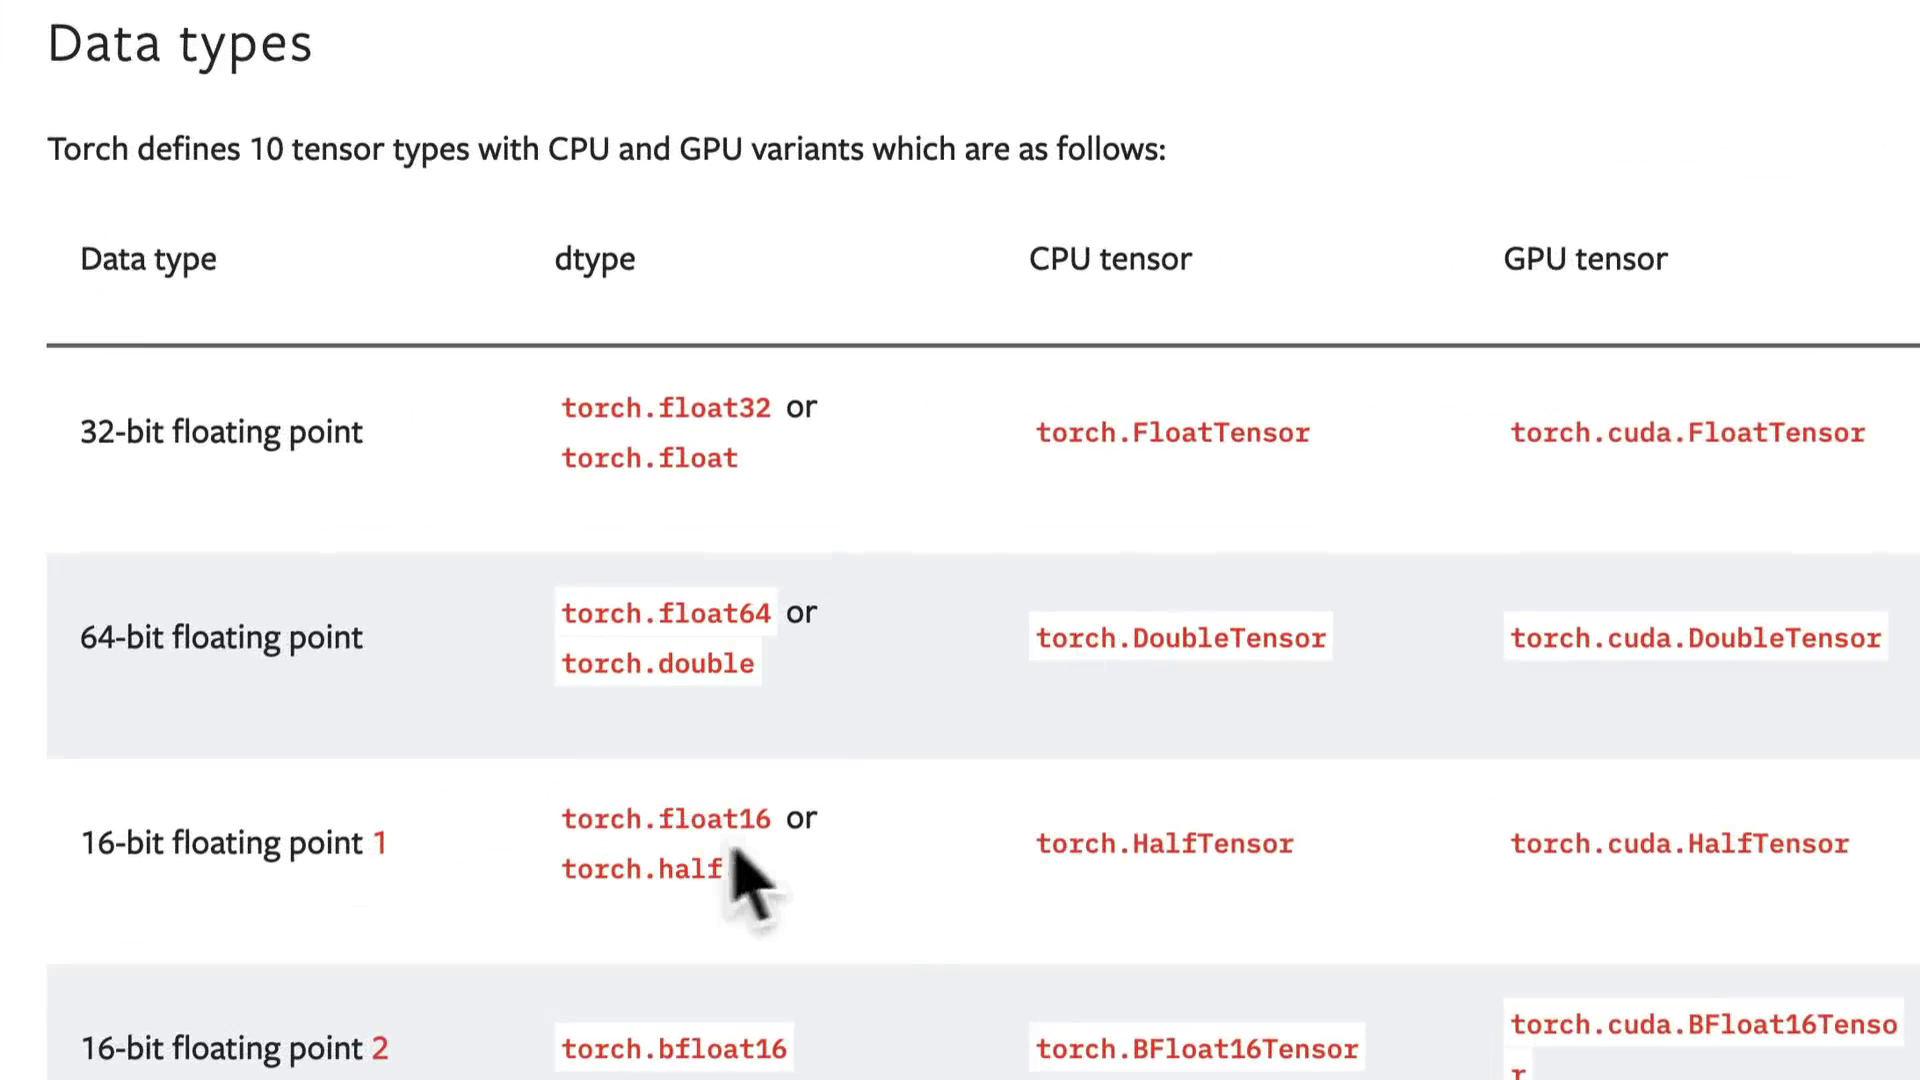
Dealing With Tensor Data Types
Getting Tensor Attributes
Manipulating Tensors (Tensor Operations)
Matrix Multiplication (Part 1)
Matrix Multiplication (Part 2): The Two Main Rules of Matrix Multiplication
Matrix Multiplication (Part 3): Dealing With Tensor Shape Errors
Finding the Min Max Mean and Sum of Tensors (Tensor Aggregation)
Finding The Positional Min and Max of Tensors
Reshaping, Viewing and Stacking Tensors
Squeezing, Unsqueezing and Permuting Tensors
Selecting Data From Tensors (Indexing)
PyTorch Tensors and NumPy
PyTorch Reproducibility (Taking the Random Out of Random)
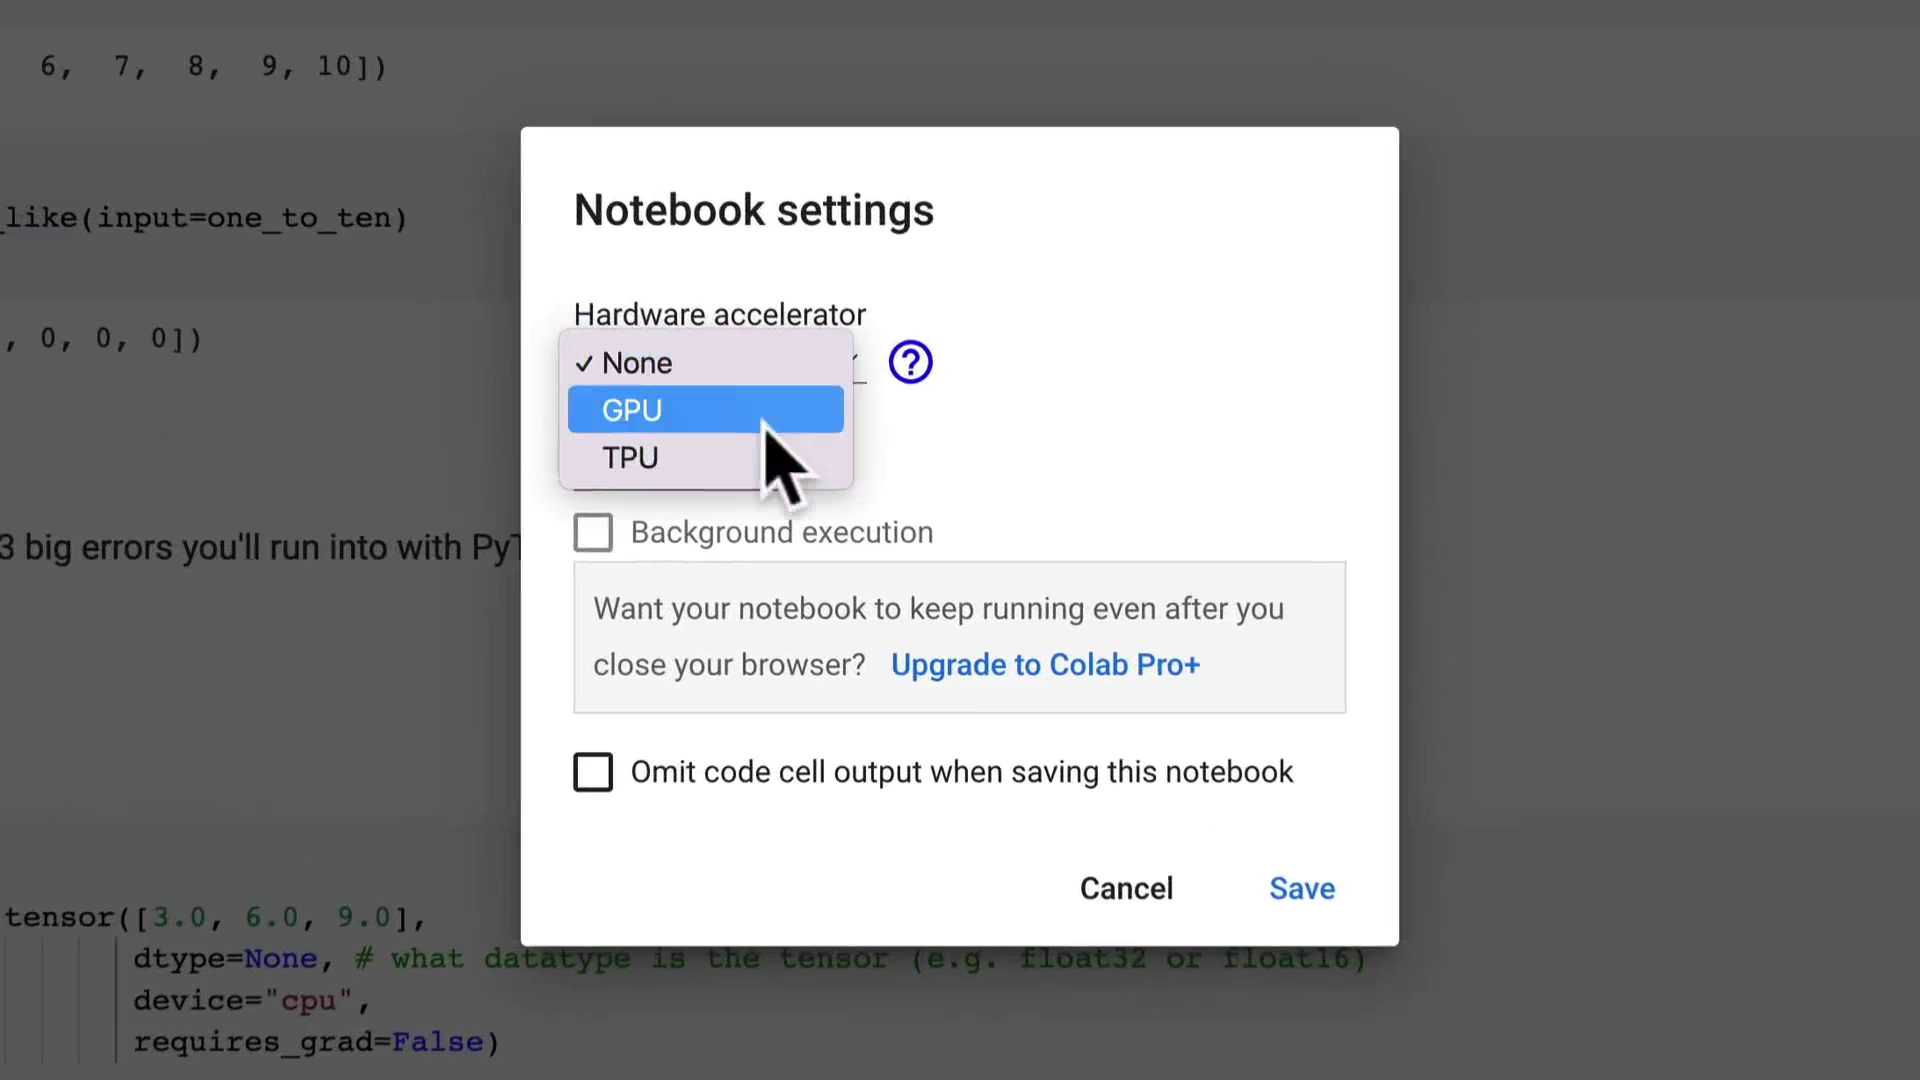
Different Ways of Accessing a GPU in PyTorch
Setting up Device Agnostic Code and Putting Tensors On and Off the GPU
PyTorch Fundamentals: Exercises and Extra-Curriculum
Introduction and Where You Can Get Help
Getting Setup and What We Are Covering
Creating a Simple Dataset Using the Linear Regression Formula
Splitting Our Data Into Training and Test Sets
Building a function to Visualize Our Data
Creating Our First PyTorch Model for Linear Regression
Breaking Down What's Happening in Our PyTorch Linear regression Model
Discussing Some of the Most Important PyTorch Model Building Classes
Checking Out the Internals of Our PyTorch Model
Making Predictions With Our Random Model Using Inference Mode
Training a Model Intuition (The Things We Need)
Setting Up an Optimizer and a Loss Function
PyTorch Training Loop Steps and Intuition
Writing Code for a PyTorch Training Loop
Reviewing the Steps in a Training Loop Step by Step
Running Our Training Loop Epoch by Epoch and Seeing What Happens
Writing Testing Loop Code and Discussing What's Happening Step by Step
Reviewing What Happens in a Testing Loop Step by Step
Writing Code to Save a PyTorch Model
Writing Code to Load a PyTorch Model
Setting Up to Practice Everything We Have Done Using Device-Agnostic Code
Putting Everything Together (Part 1): Data
Putting Everything Together (Part 2): Building a Model
Putting Everything Together (Part 3): Training a Model
Putting Everything Together (Part 4): Making Predictions With a Trained Model
Putting Everything Together (Part 5): Saving and Loading a Trained Model
Exercise: Imposter Syndrome
PyTorch Workflow: Exercises and Extra-Curriculum
Introduction to Machine Learning Classification With PyTorch
Classification Problem Example: Input and Output Shapes
Typical Architecture of a Classification Neural Network (Overview)
Making a Toy Classification Dataset
Turning Our Data into Tensors and Making a Training and Test Split
Laying Out Steps for Modelling and Setting Up Device-Agnostic Code
Coding a Small Neural Network to Handle Our Classification Data
Making Our Neural Network Visual
Recreating and Exploring the Insides of Our Model Using nn.Sequential
Setting Up a Loss Function Optimizer and Evaluation Function for Our Classification Network
Going from Model Logits to Prediction Probabilities to Prediction Labels
Coding a Training and Testing Optimization Loop for Our Classification Model
Writing Code to Download a Helper Function to Visualize Our Models Predictions
Discussing Options to Improve a Model
Creating a New Model with More Layers and Hidden Units
Writing Training and Testing Code to See if Our New and Upgraded Model Performs Better
Creating a Straight Line Dataset to See if Our Model is Learning Anything
Building and Training a Model to Fit on Straight Line Data
Evaluating Our Models Predictions on Straight Line Data
Introducing the Missing Piece for Our Classification Model Non-Linearity
Building Our First Neural Network with Non-Linearity
Writing Training and Testing Code for Our First Non-Linear Model
Making Predictions with and Evaluating Our First Non-Linear Model
Replicating Non-Linear Activation Functions with Pure PyTorch
Putting It All Together (Part 1): Building a Multiclass Dataset
Creating a Multi-Class Classification Model with PyTorch
Setting Up a Loss Function and Optimizer for Our Multi-Class Model
Going from Logits to Prediction Probabilities to Prediction Labels with a Multi-Class Model
Training a Multi-Class Classification Model and Troubleshooting Code on the Fly
Making Predictions with and Evaluating Our Multi-Class Classification Model
Discussing a Few More Classification Metrics
PyTorch Classification: Exercises and Extra-Curriculum
What Is a Computer Vision Problem and What We Are Going to Cover
Computer Vision Input and Output Shapes
What Is a Convolutional Neural Network (CNN)
Discussing and Importing the Base Computer Vision Libraries in PyTorch
Getting a Computer Vision Dataset and Checking Out Its- Input and Output Shapes
Visualizing Random Samples of Data
DataLoader Overview Understanding Mini-Batch
Turning Our Datasets Into DataLoaders
Model 0: Creating a Baseline Model with Two Linear Layers
Creating a Loss Function: an Optimizer for Model 0
Creating a Function to Time Our Modelling Code
Writing Training and Testing Loops for Our Batched Data
Writing an Evaluation Function to Get Our Models Results
Setup Device-Agnostic Code for Running Experiments on the GPU
Model 1: Creating a Model with Non-Linear Functions
Mode 1: Creating a Loss Function and Optimizer
Turing Our Training Loop into a Function
Turing Our Testing Loop into a Function
Training and Testing Model 1 with Our Training and Testing Functions
Getting a Results Dictionary for Model 1
Model 2: Convolutional Neural Networks High Level Overview
Model 2: Coding Our First Convolutional Neural Network with PyTorch
Model 2: Breaking Down Conv2D Step by Step
Model 2: Breaking Down MaxPool2D Step by Step
Mode 2: Using a Trick to Find the Input and Output Shapes of Each of Our Layers
Model 2: Setting Up a Loss Function and Optimizer
Model 2: Training Our First CNN and Evaluating Its Results
Comparing the Results of Our Modelling Experiments
Making Predictions on Random Test Samples with the Best Trained Model
Plotting Our Best Model Predictions on Random Test Samples and Evaluating Them
Making Predictions Across the Whole Test Dataset and Importing Libraries to Plot a Confusion Matrix
Evaluating Our Best Models Predictions with a Confusion Matrix
Saving and Loading Our Best Performing Model
Recapping What We Have Covered Plus Exercises and Extra-Curriculum
What Is a Custom Dataset and What We Are Going to Cover
Importing PyTorch and Setting Up Device-Agnostic Code
Downloading a Custom Dataset of Pizza, Steak and Sushi Images
Becoming One With the Data (Part 1): Exploring the Data Format
Becoming One With the Data (Part 2): Visualizing a Random Image
Becoming One With the Data (Part 3): Visualizing a Random Image with Matplotlib
Transforming Data (Part 1): Turning Images Into Tensors
Transforming Data (Part 2): Visualizing Transformed Images
Loading All of Our Images and Turning Them Into Tensors With ImageFolder
Visualizing a Loaded Image From the Train Dataset
Turning Our Image Datasets into PyTorch DataLoaders
Creating a Custom Dataset Class in PyTorch High Level Overview
Creating a Helper Function to Get Class Names From a Directory
Writing a PyTorch Custom Dataset Class from Scratch to Load Our Images
Compare Our Custom Dataset Class to the Original ImageFolder Class
Writing a Helper Function to Visualize Random Images from Our Custom Dataset
Turning Our Custom Datasets Into DataLoaders
Exploring State of the Art Data Augmentation With Torchvision Transforms
Building a Baseline Model (Part 1): Loading and Transforming Data
Building a Baseline Model (Part 2): Replicating Tiny VGG from Scratch
Building a Baseline Model (Part 3): Doing a Forward Pass to Test Our Model Shapes
Using the Torchinfo Package to Get a Summary of Our Model
Creating Training and Testing loop Functions
Creating a Train Function to Train and Evaluate Our Models
Training and Evaluating Model 0 With Our Training Functions
Plotting the Loss Curves of Model 0
Discussing the Balance Between Overfitting and Underfitting and How to Deal With Each
Creating Augmented Training Datasets and DataLoaders for Model 1
Constructing and Training Model 1
Plotting the Loss Curves of Model 1
Plotting the Loss Curves of All of Our Models Against Each Other
Predicting on Custom Data (Part 1): Downloading an Image
Predicting on Custom Data (Part2): Loading In a Custom Image With PyTorch
Predicting on Custom Data (Part 3): Getting Our Custom Image Into the Right Format
Predicting on Custom Data (Part 4): Turning Our Models Raw Outputs Into Prediction Labels
Predicting on Custom Data (Part 5): Putting It All Together
Summary of What We Have Covered Plus Exercises and Extra-Curriculum
What Is Going Modular and What We Are Going to Cover
Going Modular Notebook (Part 1): Running It End to End
Downloading a Dataset
Writing the Outline for Our First Python Script to Setup the Data
Creating a Python Script to Create Our PyTorch DataLoaders
Turning Our Model Building Code into a Python Script
Turning Our Model Training Code into a Python Script
Turning Our Utility Function to Save a Model into a Python Script
Creating a Training Script to Train Our Model in One Line of Code
Going Modular: Summary, Exercises and Extra-Curriculum
Introduction: What is Transfer Learning and Why Use It
Where Can You Find Pretrained Models and What We Are Going to Cover
Installing the Latest Versions of Torch and Torchvision
Downloading Our Previously Written Code from Going Modular
Downloading Pizza, Steak, Sushi Image Data from Github
Turning Our Data into DataLoaders with Manually Created Transforms
Turning Our Data into DataLoaders with Automatic Created Transforms
Which Pretrained Model Should You Use
Setting Up a Pretrained Model with Torchvision
Different Kinds of Transfer Learning
Getting a Summary of the Different Layers of Our Model
Freezing the Base Layers of Our Model and Updating the Classifier Head
Training Our First Transfer Learning Feature Extractor Model
Plotting the Loss Curves of Our Transfer Learning Model
Outlining the Steps to Make Predictions on the Test Images
Creating a Function Predict On and Plot Images
Making and Plotting Predictions on Test Images
Making a Prediction on a Custom Image
Main Takeaways, Exercises and Extra Curriculum
What Is Experiment Tracking and Why Track Experiments
Getting Setup by Importing Torch Libraries and Going Modular Code
Creating a Function to Download Data
Turning Our Data into DataLoaders Using Manual Transforms
Turning Our Data into DataLoaders Using Automatic Transforms
Preparing a Pretrained Model for Our Own Problem
Setting Up a Way to Track a Single Model Experiment with TensorBoard
Training a Single Model and Saving the Results to TensorBoard
Exploring Our Single Models Results with TensorBoard
Creating a Function to Create SummaryWriter Instances
Adapting Our Train Function to Be Able to Track Multiple Experiments
What Experiments Should You Try
Discussing the Experiments We Are Going to Try
Downloading Datasets for Our Modelling Experiments
Turning Our Datasets into DataLoaders Ready for Experimentation
Creating Functions to Prepare Our Feature Extractor Models
Coding Out the Steps to Run a Series of Modelling Experiments
Running Eight Different Modelling Experiments in 5 Minutes
Viewing Our Modelling Experiments in TensorBoard
Loading In the Best Model and Making Predictions on Random Images from the Test Set
Making a Prediction on Our Own Custom Image with the Best Model
Main Takeaways, Exercises and Extra Curriculum
What Is a Machine Learning Research Paper?
Why Replicate a Machine Learning Research Paper?
Where Can You Find Machine Learning Research Papers and Code?
What We Are Going to Cover
Getting Setup for Coding in Google Colab
Downloading Data for Food Vision Mini
Turning Our Food Vision Mini Images into PyTorch DataLoaders
Visualizing a Single Image
Replicating a Vision Transformer - High Level Overview
Breaking Down Figure 1 of the ViT Paper
Breaking Down the Four Equations Overview and a Trick for Reading Papers
Breaking Down Equation 1
Breaking Down Equations 2 and 3
Breaking Down Equation 4
Breaking Down Table 1
Calculating the Input and Output Shape of the Embedding Layer by Hand
Turning a Single Image into Patches (Part 1: Patching the Top Row)
Turning a Single Image into Patches (Part 2: Patching the Entire Image)
Creating Patch Embeddings with a Convolutional Layer
Exploring the Outputs of Our Convolutional Patch Embedding Layer
Flattening Our Convolutional Feature Maps into a Sequence of Patch Embeddings
Visualizing a Single Sequence Vector of Patch Embeddings
Creating the Patch Embedding Layer with PyTorch
Creating the Class Token Embedding
Creating the Class Token Embedding - Less Birds
Creating the Position Embedding
Equation 1: Putting it All Together
Equation 2: Multihead Attention Overview
Equation 2: Layernorm Overview
Turning Equation 2 into Code
Checking the Inputs and Outputs of Equation
Equation 3: Replication Overview
Turning Equation 3 into Code
Transformer Encoder Overview
Combining Equation 2 and 3 to Create the Transformer Encoder
Creating a Transformer Encoder Layer with In-Built PyTorch Layer
Bringing Our Own Vision Transformer to Life - Part 1: Gathering the Pieces of the Puzzle
Bringing Our Own Vision Transformer to Life - Part 2: Putting Together the Forward Method
Getting a Visual Summary of Our Custom Vision Transformer
Creating a Loss Function and Optimizer from the ViT Paper
Training our Custom ViT on Food Vision Mini
Discussing what Our Training Setup Is Missing
Plotting a Loss Curve for Our ViT Model
Getting a Pretrained Vision Transformer from Torchvision and Setting it Up
Preparing Data to Be Used with a Pretrained ViT
Training a Pretrained ViT Feature Extractor Model for Food Vision Mini
Saving Our Pretrained ViT Model to File and Inspecting Its Size
Discussing the Trade-Offs Between Using a Larger Model for Deployments
Making Predictions on a Custom Image with Our Pretrained ViT
PyTorch Paper Replicating: Main Takeaways, Exercises and Extra-Curriculum
What is Machine Learning Model Deployment and Why Deploy a Machine Learning Model
Three Questions to Ask for Machine Learning Model Deployment
Where Is My Model Going to Go?
How Is My Model Going to Function?
Some Tools and Places to Deploy Machine Learning Models
What We Are Going to Cover
Getting Setup to Code
Downloading a Dataset for Food Vision Mini
Outlining Our Food Vision Mini Deployment Goals and Modelling Experiments
Creating an EffNetB2 Feature Extractor Model
Create a Function to Make an EffNetB2 Feature Extractor Model and Transforms
Creating DataLoaders for EffNetB2
Training Our EffNetB2 Feature Extractor and Inspecting the Loss Curves
Saving Our EffNetB2 Model to File
Getting the Size of Our EffNetB2 Model in Megabytes
Collecting Important Statistics and Performance Metrics for Our EffNetB2 Model
Creating a Vision Transformer Feature Extractor Model
Creating DataLoaders for Our ViT Feature Extractor Model
Training Our ViT Feature Extractor Model and Inspecting Its Loss Curves
Saving Our ViT Feature Extractor and Inspecting Its Size
Collecting Stats About Our ViT Feature Extractor
Outlining the Steps for Making and Timing Predictions for Our Models
Creating a Function to Make and Time Predictions with Our Models
Making and Timing Predictions with EffNetB2
Making and Timing Predictions with ViT
Comparing EffNetB2 and ViT Model Statistics
Visualizing the Performance vs Speed Trade-off
Gradio Overview and Installation
Gradio Function Outline
Creating a Predict Function to Map Our Food Vision Mini Inputs to Outputs
Creating a List of Examples to Pass to Our Gradio Demo
Bringing Food Vision Mini to Life in a Live Web Application
Getting Ready to Deploy Our App Hugging Face Spaces Overview
Outlining the File Structure of Our Deployed App
Creating a Food Vision Mini Demo Directory to House Our App Files
Creating an Examples Directory with Example Food Vision Mini Images
Writing Code to Move Our Saved EffNetB2 Model File
Turning Our EffNetB2 Model Creation Function Into a Python Script
Turning Our Food Vision Mini Demo App Into a Python Script
Creating a Requirements File for Our Food Vision Mini App
Downloading Our Food Vision Mini App Files from Google Colab
Uploading Our Food Vision Mini App to Hugging Face Spaces Programmatically
Running Food Vision Mini on Hugging Face Spaces and Trying it Out
Food Vision Big Project Outline
Preparing an EffNetB2 Feature Extractor Model for Food Vision Big
Downloading the Food 101 Dataset
Creating a Function to Split Our Food 101 Dataset into Smaller Portions
Turning Our Food 101 Datasets into DataLoaders
Training Food Vision Big: Our Biggest Model Yet!
Outlining the File Structure for Our Food Vision Big
Downloading an Example Image and Moving Our Food Vision Big Model File
Saving Food 101 Class Names to a Text File and Reading them Back In
Turning Our EffNetB2 Feature Extractor Creation Function into a Python Script
Creating an App Script for Our Food Vision Big Model Gradio Demo
Zipping and Downloading Our Food Vision Big App Files
Deploying Food Vision Big to Hugging Face Spaces
PyTorch Mode Deployment: Main Takeaways, Extra-Curriculum and Exercises
Thank You!
Файлы примеров: не предусмотрены
Формат видео: MP4
Видео : AVC, 1920x1080 (16:9), 30.000 fps, 3 000 kb/s (0.017 bit/pixel)
Аудио: AAC, 44.1 kHz, 2 ch, 128 kb/s, CBR


